A little over a year ago a sweet baby girl named Lila was born. I had never met her. My husband worked with her father and had asked me to make a gift for her. I quickly obliged since it meant being able to use my craft goodies. After thinking a while, I decided upon a foot stool and some blocks. My cousin gave me a stool at my daughter's baby shower five and a half years ago and it is the single most thing we use. Every day. So much so that I had to make another one for my son since my children were getting too big to both stand on it at the same time. Seriously, if you are scrambling for a gift that will stand out and be remembered, a stool will do it. Even if you aren't creative, you can just paint the thing and be finished.
I got the stool and blocks at Hobby Lobby. If you go there weekly, like I do, (did) you can figure out when things will be on sale so you don't have to pay full price, or you can just use that precious 40% off coupon that comes out weekly. And surely you must know by now that you don't have to print the coupon if you have the app on your phone. Just show them the coupon and they are good!
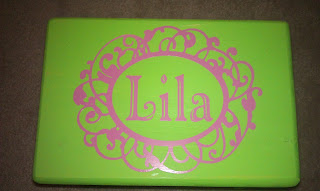
I sanded the stool and painted it an apple green. I used my Cricut cartridge Fancy Frames and cut out frame #12 at 6 inches in some pink, permanent Oracle vinyl. I also cut out the name in the font from Winter Woodland. After applying it to the stool I lightly covered it with a sealer to protect the whole thing. Here is the finished project.


I got the stool and blocks at Hobby Lobby. If you go there weekly, like I do, (did) you can figure out when things will be on sale so you don't have to pay full price, or you can just use that precious 40% off coupon that comes out weekly. And surely you must know by now that you don't have to print the coupon if you have the app on your phone. Just show them the coupon and they are good!
I sanded the stool and painted it an apple green. I used my Cricut cartridge Fancy Frames and cut out frame #12 at 6 inches in some pink, permanent Oracle vinyl. I also cut out the name in the font from Winter Woodland. After applying it to the stool I lightly covered it with a sealer to protect the whole thing. Here is the finished project.

Isn't it pretty? What is funny, though, is that I confirmed her name (thought I had confirmed her name) and the spelling of the name but my husband said he would double check. Upon checking again, he said it was spelled Lyla not Lila.

Grrrr....no, we are not finished yet. He later confirmed, for the third time, that her name was indeed spelled Lila. Oh. My. Gosh. So I peeled off her name and repositioned the letters again. It was easy because I had saved the file on my Gypsy and I didn't have to remember what size I had cut it.
Unfortunately I had already cut the letters for the blocks and made them and those took a lot more work to do. I also didn't save the file so I didn't even remember what font I had chosen for them. Now I believe it is the font from Kate's ABC's. But still, they did turn out pretty! :)


First I painted the blocks with non-toxic, acrylic paint. Then I sanded the stuff out of them so they wouldn't be too pointy on the edges for sweet, little hands. It also adds to the look because they look like they've been played with for a generation or two. If you don't like that look you can sand them first. I measured my blocks and then cut out paper squares just a little bit smaller than the block size so you could still see some of the paint surrounding it. Then I cut the letters out and used a shadow underneath to make the letters stand out a bit more. The paper I used was a little 6 x 6 stack from the Prima Madeline collection. Super pretty and vintage looking. After they were finished I used waterproof Mod-Podge to cover them. It is non-toxic also and I figured waterproof was the way to go just in case someone decided to taste them. Hey you know it happens.
Now flash forward to a year later. I have now had the pleasure of not just meeting this little love, Lila, but I have become good friends with her mama and daddy as well. What a beautiful family! And we just found out that Miss Lila will be a big sister in 2014! Yaaaay! Guess I better get to working on something for her baby brother or sister. I'll wait to put a name on it though, just in case.
Have a great day and thanks for staying a bit! Cheers!
Comments
Post a Comment